Managing and Updating your BIOS
UEFI BIOS - Graphics Mode
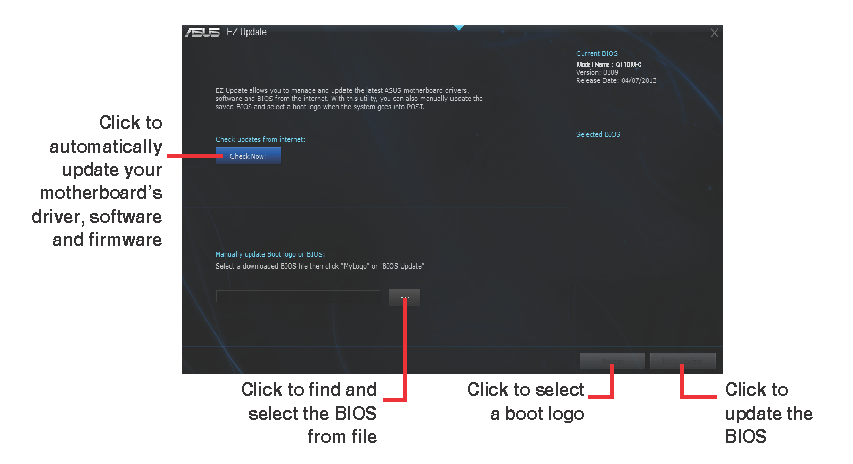
ASUS EZ Update Utility
EZ Update is a utility
that allows you to automatically update your motherboard’s softwares,
drivers and the BIOS version easily. With this utlity, you can also manually
update the saved BIOS and select a boot logo when the system goes into
POST.
Launching
EZ Update
Place
the support DVD
in the optical drive. The Specials menu appears.
Click
the Utilities tab, then click AI
Suite 3.
Follow
the onscreen instructions to complete the update.
ASUS EZ Flash 3
The ASUS
EZ Flash 3 feature allows you to update the BIOS
without using an OS-based utility.

|
Before
you start using this utility, download
the latest BIOS
file from the ASUS website at www.asus.com.
Check
your local Internet connection before updating through
the Internet. Ensure
the BIOS default settings are loaded to ensure system
compatibility and stability. Select the Load Optimized
Defaults item under the Exit menu.
|
To update the BIOS using EZ Flash 3:
Enter the Advanced
Mode of the BIOS setup program. Go
to the Tools
menu to select ASUS
EZ Flash 3 Utility
and press <Enter> to enable it.
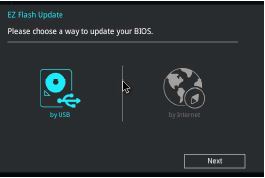
Via
USB
Insert the USB flash disk that contains
the latest BIOS file into the USB port, then select by USB
Press <Tab>to switch to the Drive
field.
Press
the Up/Down arrow keys to find the USB
flash disk
that contains the latest BIOS,and
then press <Enter>.
Press <Tab> to switch to the Folder Info field.
Press the Up/Down arrow keys
to find
the BIOS file,and then
press <Enter> to
perform the BIOS update process.
Reboot the system when the update process is done.
Via
the Internet
Select by
Internet
Press
the Left/Right arrow keys to select an Internet connection method,
and then press <Enter>.
Follow
the on screen instructions to complete the update. Reboot
the system when the update process is done.
ASUS
CrashFree BIOS 3 Utility
The ASUS CrashFree
BIOS
3
is an auto recovery tool that
allows you
to restore the BIOS
file when it
fails or gets corrupted during the
updating process. You
can restore a
corrupted BIOS file
using the
motherboard support DVD
or a USB
flash drive that contains the updated
BIOS
file.
|
Before using this utility, rename
the BIOS
file in the removable device into Q270C.CAP
The BIOS
file in the support DVD may
not be the latest version. Download
the latest version BIOS
file from the ASUS website at www.asus.com.
|
Recovering
the BIOS
Turn
on the system.
Insert
the support DVD
into the optical drive or the USB flash drive
that contains the BIOS file into
the USB port.
The utility automatically
checks the devices for the BIOS
file. When found, the utility reads the BIOS
file and enters ASUS EZ Flash 3 utility automatically.
The
system requires you to enter BIOS Setup
to recover BIOS setting.
To ensure system compatibility and stability,
we recommend that you press <F5> to load default BIOS values.
UEFI BIOS - Text Mode
ASUS
EZ Flash
The Asus EZ Flash feature
allows you to update the BIOS without using an OS-based utility.

|
Before you start using this
utility, download the
latest BIOS
file from the ASUS website at www.asus.com.
Check your local Internet connection
before updating through the Internet.
|
To update the BIOS using
EZ Flash:
Insert the
USB flash disk containing the latest BIOS into the USB port.
Press <Alt>
+ <F2> during POST to enter Asus EZ Flash utility.
Press the
Up/Down arrow keys to find the USB flash disk containing the latest
BIOS.
Press the
Left/Right arrow keys to switch to the Folder Info field.
Press the
Up/Down arrow keys to find the BIOS file, and then press <Enter>
to perform the BIOS update process. Reboot the system when
the update process is complete.
ASUS BIOS
Updater
The ASUS BIOS
Updater allows you
to update
the BIOS
in a DOS environment.
Before Updating the BIOS
Prepare the motherboard support
DVD
and a USB
flash drive.
Download
the latest BIOS
file and BIOS
Updater from the ASUS website at http://support.asus.com and save
them on your USB
flash drive.
Turn off the
computer.
Ensure that your
computer has a DVD optical drive.
Booting the system in DOS environment
Insert the USB
flash drive
with the
latest BIOS
file and
BIOS
Updater
into the USB
port.
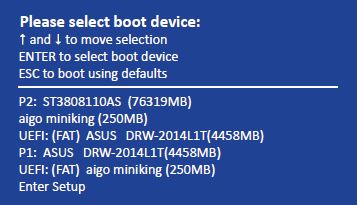
Boot
your computer then press <F8> to launch the select boot
device screen.
When the select boot device screen appears,
insert the support DVD
into the optical drive and select the optical drive as the boot device.
When the booting message
appears,press <Enter> within five (5) seconds to enter the
FreeDOS prompt.

At the FreeDOS prompt, type d: and
press <Enter> to switch the disk
from
Drive
C
(optical
drive)to
Drive
D
(USB
flash
drive).

Updating
the BIOS file
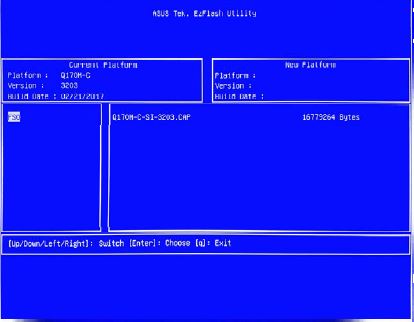
At the FreeDOS prompt, type bupdater
/g and press <Enter>.

The
BIOS Updater
screen appears as below.
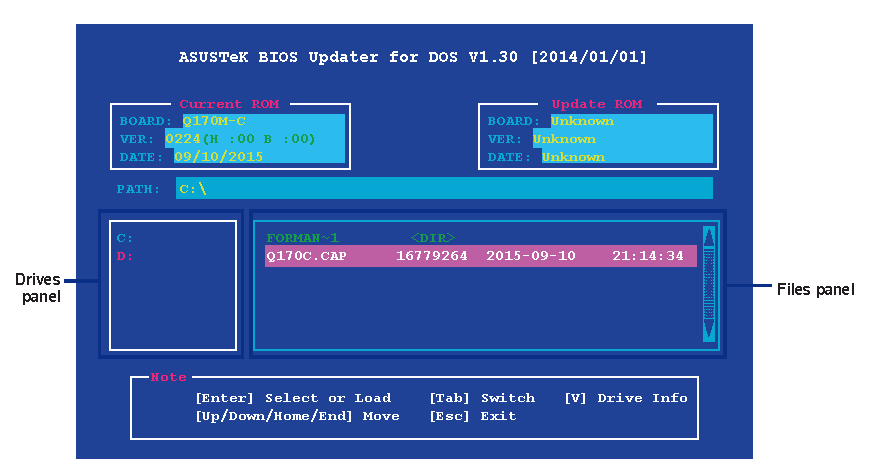
Press
<Tab>
to switch from
Files panel to Drives panel then select
D:
Press <Tab>
to switch
from
Drives panel to Files panel and
use the <Up/Down/Home/End>
keys
to select
the
BIOS file and
press <ENTER>.
After
the BIOS Updater checks the selected BIOS file, select Yes to
confirm the BIOS update
is done, then press <Enter>.

When BIOS update is done, press <ESC>
to exit BIOS Updater.
Restart your computer.
|
DO NOT shut down or reset the
system while updating the BIOS to prevent system boot
failure. Ensure to load the BIOS
default settings to ensure system compatibility and stability.
Select the Load
Optimized Defaults item under the Exit Menu.
|
