
Using the power button, reset button, or the CTRL + ALT + DEL keys to force reset from a running operating system can cause damage to your data or system. We recommend to always shut down the system properly from the operating system.
Use the BIOS Setup program to update the BIOS or configure its parameters. The BIOS screens include navigation keys and brief online help to guide you in using the BIOS Setup program.
Press <Delete> or <F2> during the Power-OnSelf Test (POST). If you do not press <Delete> or <F2>, POST continues with its routines.
To enter BIOS setup after POST, do one of the following:
Press <Ctrl>+<Alt>+<Del> simultaneously.
Press the reset button on the system chassis.
Press the power button to turn the system off then back on. Do this option only if you failed to enter BIOS Setup using the first two options.
|
|
 |
|
The Main screen of the BIOS looks like this. Along the top of the screen is a menu bar that includes Main, Ai Tweaker, Advanced, Monitor, Boot and Exit.
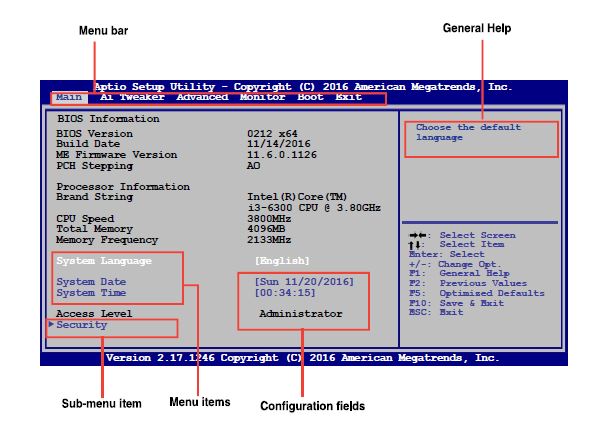
The menu bar at the top of the screen has the following main items:
| Main | For changing the basic system configuration settings like language, date/time and setting a BIOS password |
| Ai Tweaker | For changing power, speed and overclocking settings |
| Advanced | For changing the advanced system settings by experienced technicians |
| Monitor | For displaying the system temperature, power status, and changing the fan settings as well the chassis intrusion settings |
| Boot | For changing the system boot configuration |
| Exit | For selecting the exit options and loading default settings |
The highlighted item on the menu bar displays the specific items for that menu. For example, selecting Main shows the Main menu items. The other items (Ai Tweaker, Advanced, Monitor, Boot and Exit) on the menu bar have their respective menu items.
An arrow (►) before each item on any menu screen means that the item has a submenu. To display the submenu, select the item and press<Enter>.
The language of the BIOS is displayed on the MAIN page and can be changed.
Q-fan configuration in the Monitor menu can be used to manually tweak the fans to your desired settings.
At the bottom right corner of the menu screen are the navigation keys for the BIOS setup program. Use the navigation keys to select items in the menu and change the settings.
At the top right corner of the menu screen is a brief description of the selected item. On any menu, use <F1> key to display a list of available function keys.
These fields show the values for the menu items. If an item is user-configurable,you can change the value of the field opposite the item. You cannot select an item that is not user-configurable. A configurable field is highlighted when selected. To change the value of a field,select it and press <Enter> to display a list of options.
 |
|