Configuring for RAID
RAID Definitions
RAID 0 (Data striping)
RAID
0 optimizes two identical hard disk drives to read and write data in parallel,
interleaved stacks. Two hard disk drives perform the same work as a single
drive but at a sustained data transfer rate, double that of a single disk
alone, thus improving data access and storage.
Use of two new identical drives is required for this setup.
RAID 1 (Data mirroring)
RAID
1 copies and maintains an identical image of data from one drive to a
second drive. If one drive fails, the disk array management software
directs all applications to the surviving drive as it contains a complete
copy of the data on the other drive. This RAID
configuration provides data protection and increases fault tolerance to
the entire system. Use two new drives or use an existing drive and
a new drive for this setup. The new drive must be of the same size
or larger than the existing drive.
RAID 10
RAID
10 is data striping and data mirroring combined without parity having
to be calculated and written. With the RAID
10 configuration you get all the benefits of both RAID
0 and RAID 1 configurations. Use
four new hard disk drives or use an existing drive and three new drives
for this setup.
The motherboard supports Serial ATA hard disk
drives and NVMe SSD storage devices. For optimal performance, install
identical drives of the same model and capacity when creating a disk array.
RaidXpert2 Configuration Utility in UEFI
BIOS
To enter the RaidXpert2 Configuration Utility
in UEFI BIOS:
Enter the BIOS
Setup during POST.
Go
to the Advanced menu, select SATA
Configuration, then set SATA
Mode to [RAID].
Configure
additional settings for your storage device and RAID configuration:
If you are using Hyper M.2 x16 cards (purchased
separately), go to the Advanced menu, select Onboard
Devices Configuration, then set all the corresponding PCIe
slots to [PCIe RAID Mode].
If you are setting up an NVMe RAID set,
go to the Advanced menu, select AMD
PBS, then set NVMe RAID mode
to [Enabled].
Go
to the Boot menu, select CSM (Compatibility
Support Module), select Launch
CSM, then set the item to [Disabled].
Save
your changes and exit the BIOS Setup, then enter the BIOS Setup again.
Go
to the Advanced menu, select RaidXpert2
Configuration Utility, to display the RaidXpert2 Configuration
Utility menu.
 |
Due
to chipset limitations, when SATA ports are set to RAID mode,
all SATA ports run at RAID mode together. |

Creating
a RAID Set
From
the RaidXpert2 Configuration Utility menu, go to Array
Management, then select Create
Array to enter the Create Array menu. The following screen
appears.

When the RAID Level item is selected, press
<Enter> to select the RAID level to create, and then press <Enter>.
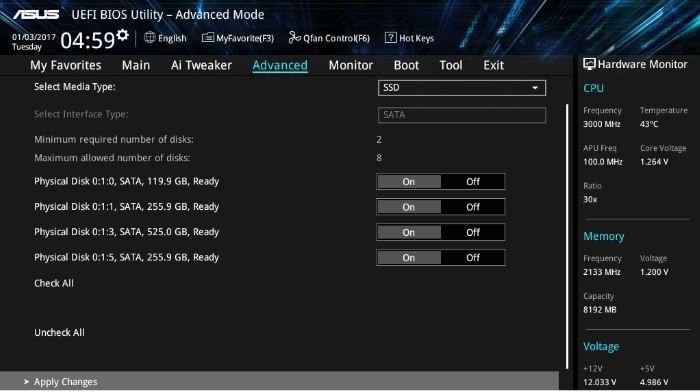
Under
Select Physical Disks, press
<Enter>. The following screen appears.
You can select
SATA, SSD or both. Turn ON the disks you want to include in the
RAID set and select Apply
Changes, then press <Enter>.
When
returning to the RaidXpert2 Configuration
Utility menu, select the Array Size and other detailed policies, press
<Enter>. Save the changes when finished.
|
You
can specify the array size to be created. Choosing the value
0 will set the maximum supported array size when a valid configuration
is selected. |

Deleting a RAID Set
 |
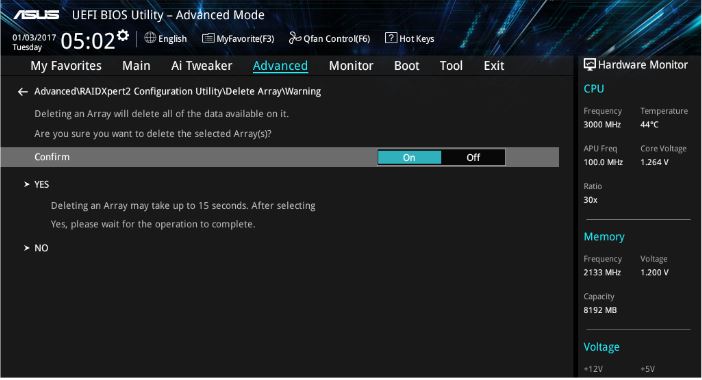
Be
cautious when deleting a RAID set. You will lose all data on the
hard disk drives when you delete a RAID set. |
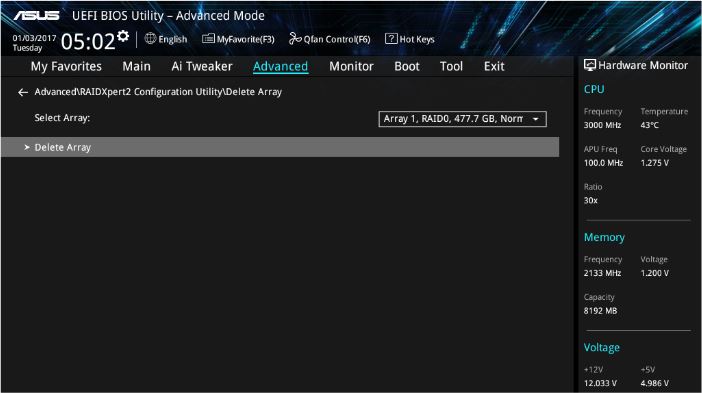
To delete a RAID set:
Select RaidXpert2 Configuration Utility, then
select Delete Array and press
<Enter>. Select the Array you want to delete and select
Delete Array, press <Enter>.
Select
On to confirm your choice
and then select Yes to delete
the RAID Array and return to the RaidXpert2
Configuration Utility menu,
or select No to cancel.
Creating a RAID driver disk in Windows
During
the OS installation, click Load Driver
to allow you to select the installation media containing the RAID
driver. Make sure the UEFI driver for the optical drive is loaded.
Insert the supported
USB flash drive with the RAID driver into the USB port, and then click
Browse.
Click the name
of the device you've inserted, go to Drivers,
then RAID, and then select
the RAID Bottom drivers first and click OK,
then select the RAID driver for the corresponding OS version, click
OK.
Follow the succeeding
screen instructions to complete the installation.
